Editing the DNS servers on Ubuntu is an easy task, here is a little documentation to how to do it.
Check your current configuration
To view the current DNS servers that are being used per interface, you can use this command :
resolvectl status
Or this one for Ubuntu 20.04 or newer :
systemd-resolve --status
These commands will show you the DNS server(s) being used by each network interface.
Edit DNS servers temporarily
To temporarily edit the DNS server, edit the /etc/resolv.conf file.
In /etc/resolv.conf, the line which starts with the keyword nameserver deals with DNS Servers.
Do not remove the line that says nameserver 127.0.0.53. Comment it out by putting a pound/hash symbol at the beginning of that line.
Add a line for every DNS server you’d like to add, here an example with Cloudflare DNS servers :
nameserver 1.1.1.2
nameserver 1.0.0.2
Here we add two DNS servers one main and one as a fallback;
You can then verify if the DNS server changed with the help of dig command.
$ dig google.com | grep SERVER
;; SERVER: 1.1.1.2#53(1.1.1.2) (UDP)
Grep-ing the output, we see that Cloudflare’s DNS servers are being used. That confirms that the temporary change in DNS server was in effect immediately.
Permanently change DNS
If you want to permanently change your DNS server (Persists after a reboot) you will have to edit the YAML network config file that resides in the /etc/netplan/ directory.
Before that, note down the name of your network interface beforehand. You can do so using the ip command:
ip add
Usually, there is only one file in /etc/netplan/ directory, but the name is mostly different. If there are multiple files, grep all files for your interface name. That should narrow down the candidate file to one.
grep -H INTERFACE_NAME *.*
Once you know the filename, open it for editing. You should see something similar to this output :
My network interface is called ‘enp1s0‘, yours might be different.
Under my interface, I will add the nameservers field (below, not under dhcp), and another filed called addresses under it as well. I will specify the address in a bracket, separated by commas, like so :
For a reason or an other, you may want to reinstall MacOs, maybe you changed your drive or you bricked your device, in any case here is a little post about how to reinstall MacOs and debug steps if it fails.
The easy task that may save you a reset
An easy task that resolves a lot of bootlooping problems or just macs that won’t boot is to reset NVRAM Memory. This memory is responsible of storing some Mac settings but this is not used to store user data, so you can reset it to unlock macs in some situations.
To reset NVRAM shut down your mac then hold Alt + Command + P + R
Keep these key down until your mac start restarting two times then let go.
If that doesn’t resolve your problems, you can pursue to reinstall MacOs.
Installation using Recovery Mode
On MacOs, depending of your version you may have a recovery partition that will help you recover your OS.
To boot into Recovery Mode, restart your Mac and hold down Command + R as soon as your Mac shuts off and while the computer is booting. Then, release the keys, you will see the Apple logo, then the following screen :
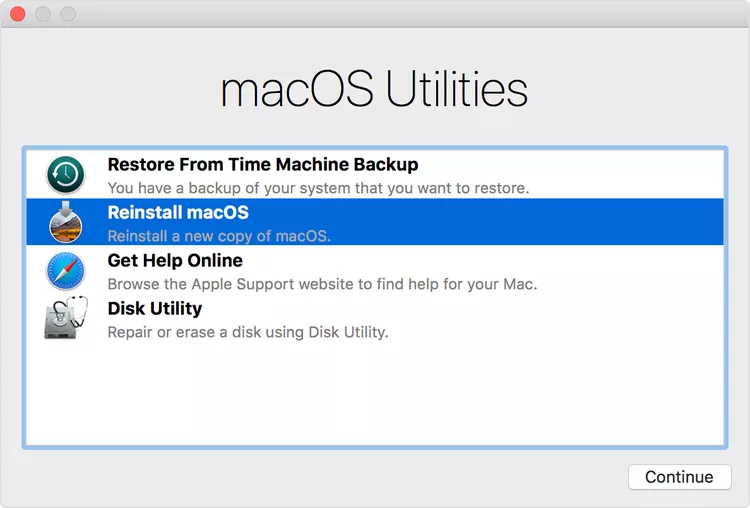
You will be welcomed with this screen (Can change depending of your version)
Click on reinstall MacOs, then click on “Continue” and follow the instructions.
Your mac should reinstall it’s OS while keeping your user data. This will fix your mac if something was wrong or corrupted on the operating system side (OS).
If this step don’t fix your mac, see other solutions below.
The easiest way : Online recovery
If the previous recovery option didn’t worked or you don’t care about the data on the drive and you have access to an internet connection, you can just use the internet recovery option. It’s by far the easiest way to install an operating system, on any apple computer.
Just shut down your mac then, press Option + Command + R to reinstall the latest compatible OS version for your mac.
Alternatively you can use Control + Maj + Command + R to install the version of MacOs that was installed when it was released or the closest one.
Follow the instructions, and you should be good to go.
If the installation fails, check the debug steps below.
Troubleshooting
Check your connection, you should have a DHCP IP address and a working internet connection for this method to work.
Try to update your NTP server on your mac : For that open your terminal and type sudo ntpdate -vu time.apple.com Note that sudo may not be necessary. If that fails, you may have a connection problem.
The hard way : Complete wipe
If you don’t care about the data on your drive, or you don’t have any more options, you can erase your disk and start from fresh.
Shut down your mac
Boot in recovery mode : Command + R
Select your disk on left pane
Click Erase
Choose Apple File System (APFS) as your format Note : If you are installing High Sierra or earlier, choose MacOs Extended (Journaled)
Give your disk a name, default is “Macintosh HD“
Click Erase
Exit the disk utility
Click “Install MacOS“
Follow the instructions
Create a Bootable USB
If your drive is completely empty, or you have no way of recover from internet or from the recovery partition, you can create an external bootable device to reinstall MacOs on your device.
Note : To create a bootable media for MacOs, you will need another MacOs device. I didn’t found another reliable way to do it for now.
To do that you have to download the MacOs installer that you wish to install and that is compatible with your device. The easiest way to do that is to download it from the AppStore if you have an other Apple device on hand or using a external app.
Then, you will need an USB stick, 16GB is recommended for latest systems, but 8 can be enough for an older one.
Connect the stick to another Mac, format it to APFS for latest OS releases (After High Sierra) or in HFS (Journalised) for pre-high sierra.
Then open a terminal and type the following command and change “RELEASE” to your MacOs version (Use tab to auto complete) and “USB NAME” to your USB key name.
If the command don’t work, make sure thatthe MacOs installer is in your “Applications” folder, also try to delete the paths and use tab to autocomplete.
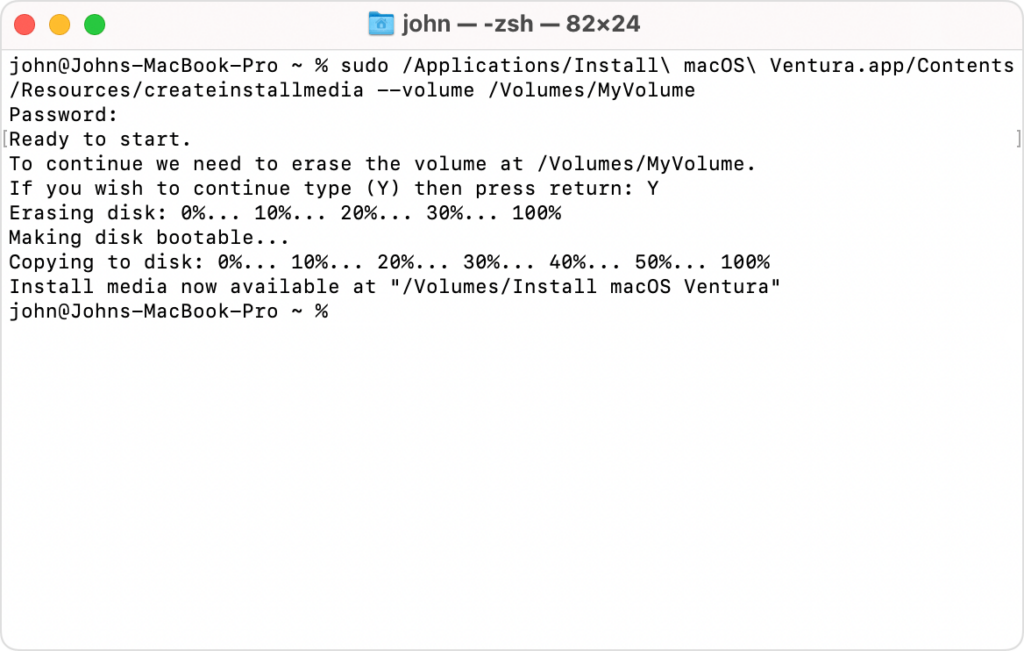
Install media creation
You should be seeing a loading in your terminal window, just like in the picture.
When done, remove the USB stick, plug it into the Mac you want to recover and press alt while booting.
You will have the choice to boot off the integrated storage or your USB key, choose the USB and follow the steps !
And here you go ! You reinstalled MacOs on your device.
We need to generate the password or keyfile that can unlock your LUKS partition, this “password” will then be a way to unlock your LUKS partition. To create it we can use the following command.
You then need to create a LUKS partition using GUI, or using command line with the following commands :
Find the partition you want to encrypt
lsblk
Then we need to use an utility that is already install on most of Linux distributions (cryptsetup) and use it to encrypt our partition with our keyfile.
cryptsetup luksFormat partition/pathto/keyfile
When it’s done, you should be able to open your encrypted partition using the same utility. In this example DEV is your LUKS partition, MAPPING a name you want to give to the LUKS mapping (That can be anything).
cryptsetup luksOpen DEV MAPPING --key-file /pathto/keyfile
Then you can close it.
cryptsetup luksClose MAPPING
Now that we checked that our partition encryption works and our keyfile too, we can plug the USB drive we want to use and copy the keyfile to it.
cp /pathto/keyfile/pathtousbdrive/keyfile
We’re almost done, now we need to specify that we want to unlock our partition automatically when the USB is connected in the crypttab configuration file.
nano /etc/crypttab
And add a line that will vary depending of your configuration
There you go, the last step is to regenerate the initramfs image of your system to apply these changes, to do that use the following commands depending of your system.
If you want to be safe you can also backup the current initramfs you are using.
If you installed a new disk to your Windows computer and want to move the boot partition to this new one, you may want to stick with the following instructions.
Start the command prompt cmd.exe as administrator
Type and start diskpart
Find the disk you want to use with list disk
Select that disk with select disk
List partitions with list partition
Select that partition with select partition
Shrink partition with (size in MB) shrink desired=200
Create new EFI partition with create partition efi size=200
Format partition as FAT32 with format quick fs=fat32
Assign letter to that new partition with assign letter=x (Can be a free letter of your choice)
exit
Now to install boot files one can use the following command :
bcdboot C:\Windows /s X:
Make sure to use the proper devices names for the previous command, C:\ must be your current Windows install and X: your new disk.
When you are done with the previous steps, please make sure to check the boot order in your BIOS/UEFI settings and select the new device first in the boot sequence.
Maybe you just installed Ubuntu and don’t want to use the Snap application format or maybe you needed some Snap packages but not anymore and you want to get rid of the Snap processes and folders.
What is Snap ?
Snap is package type just like Flatpack or Appimage, it is used to ship software and it is cross-compatible with other Linux distros as well. It has been pushed forward by Canonical, the company that mainly develop Ubuntu but it also suffer from a really bad reputation.
How to delete Snap ?
Here is a small guide to delete and purge Snap from your system.
Alternatively, you can use a script like https://github.com/popey/unsnap this kind of script automate the whole process and remplace every Snap package you previously had installed by it’s Flatpack version.
Crowdsec is a relatively new tool in the security world, it’s an Intrusion Prevention Systems (IPS), it allow the detection of threats and the adding of necessary firewall rules if needed.
Crowdsec differs from other IPS because of the collaboration aspect. It also offer an on-premise or cloud dashboard.
You may have heard, or used Fail2ban, it basically do the same things, but with more functionalities.
Pros
Open-Source
Collaborative security
Decoupled detection and action software
Ease of use
IPv6 Ready
GDPR Compliant
Easy to install & setup
Large support for many services
Cons
Not easily understandable
Can be hard to setup depending on your setup
Type of recognized threats
Threats recognized by Crowdsec
How does it works ?
First it gather the logs and parse them from any source, it also applies scenarios to identify cyber-threats, then rules are set depending of the desired behavior.
Crowdsec has two main components, the scenarios and the bouncers. The scenarios detect the type of threat and the bouncers make an action to ban/correct it. You can also choose to only use one of the two parts.
Bouncers are used to “apply” decisions, from threats detected by the Crowdsec software.
Before installing the basic bouncer that will act on your firewall rules, you need to check if your system is using iptable or nftableto determine where your system should act to prevent the attacks.
Then, you can use the basic firewall bouncer. It will check for the most common cases of attacks on your server (Brute-force, Slow brute-force, …).
apt install crowdsec-firewall-bouncer-iptables
Install the Linux firewall bouncer
Then, depending of the service(s) you are running on your server, you can use one more other bouncers.
An other step towards internet privacy & security.
Quick recap about DNS and encrypted internet traffic.
Domain Name Service (DNS) acts like a phone book, but instead of linking a phone number to a person, it links an IP address to a domain name. It’s like a huge registry remembering entries for IP/domain name association.
When a computer wants to reach out a domain, let’s say google.com, it ask the DNS server for an IP to reach. because computers communicates with IP adresses to find the path to access it, this service is one of the most important on the internet. The DNS server then “resolve” the domain name to an IP and send back the answer to the computer who asked for it.
DNS Protocol
But why are we talking about that old protocol ?
By default, DNS queries and responses are sent in plain text (via UDP), which means they can be read by networks, ISPs, or anybody able to monitor transmissions. Even if a website uses HTTPS, the DNS query required to navigate to that website is exposed.
This lack of privacy has a huge impact on security and, in some cases, human rights; if DNS queries are not private, then it becomes easier for governments to censor the Internet and for attackers to stalk users’ online behavior.
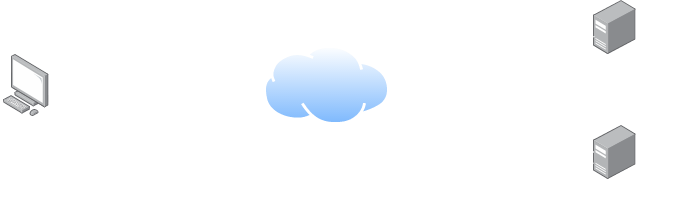
DNS over TLS protected traffic. Source : Cloudflare
More and more public DNS providers start to support encrypted DNS requests, this prevents third parties to access or modify the DNS queries made between your terminal and the DNS server.
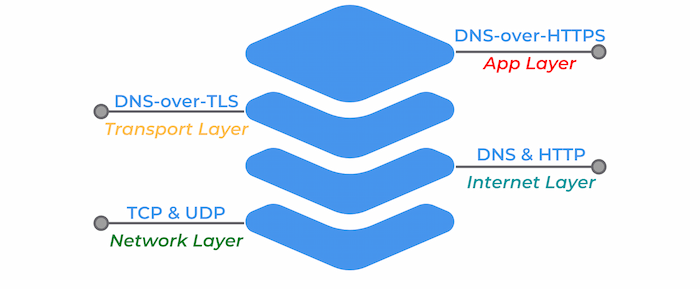
DoH is DNS over HTTPS, an encrypted DNS making use of port 443, which mean that it appears just like regular HTTPS traffic. This kind of requests are more interesting from a privacy standpoint, because they cannot be differentiated from other day to day HTTPS traffic. This is certainly the best solutions for individuals.
Note : If you are using a firewall or other networking equipment keep in mind that the DNS traffic in not even recognizable and cannot be treated as such, no rules or traffic routing can be applied to this particular DNS traffic because it looks just like regular HTTPS.
DoT on the other hand is DNS over TLS, an encrypted DNS using port 853. It’s still a DNS request, but wrapped in TLS, in a lower layer level encryption. It also ensure that requests are not tampered during the communication with the DNS server.
Source : dnsfilter.com
PfSense Firewall configuration for DoT
Prerequisites
First, you need to choose your DNS resolver. If it’s not already done make sure that it support encrypted DNS queries. Feel free to check the privacy project website to find one.
List of public DNS | Encryption support indicated
Make sure your pfSense version is greater than 2.4.4. If not, you can find the old tutorial on the Netgate website below.
Setup for pfSense 2.4.4 and before
Step 1
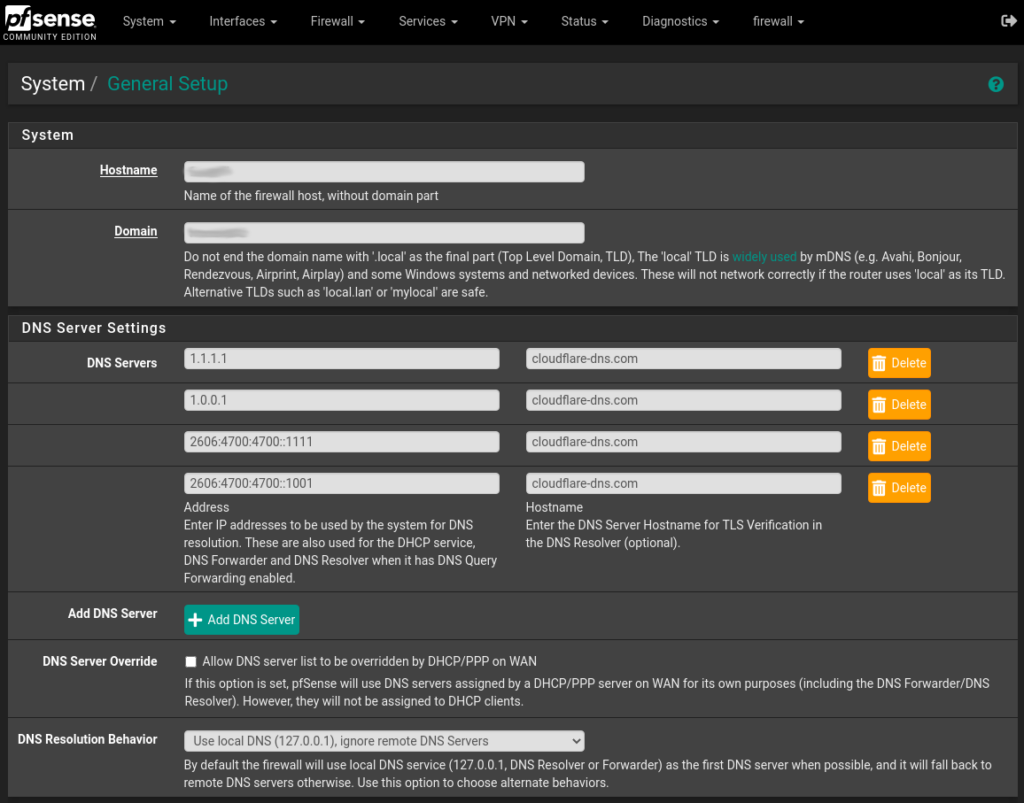
The first step is to ensure that your selected DNS provider servers are in use, even if the DNS queries are not sent over TLS for now (step 2). To set this up, navigate to System > General Settings and under DNS servers add the IP addresses & hostnames for your encrypted DNS provider. Also use the Use local DNS, ignore DNS Servers option in the drop down menu.
Pfsense DNS Settings
After entering the informations, scroll down to the bottom of the page and click Save. Your pfSense server will now use your selected DNS providers for it’s own DNS requests.
Feel free to mix and match the servers, you can add as many as you like, and using multiple DNS providers can help prevent an upstream outage from causing loss of DNS resolution on the firewall.
Step 2
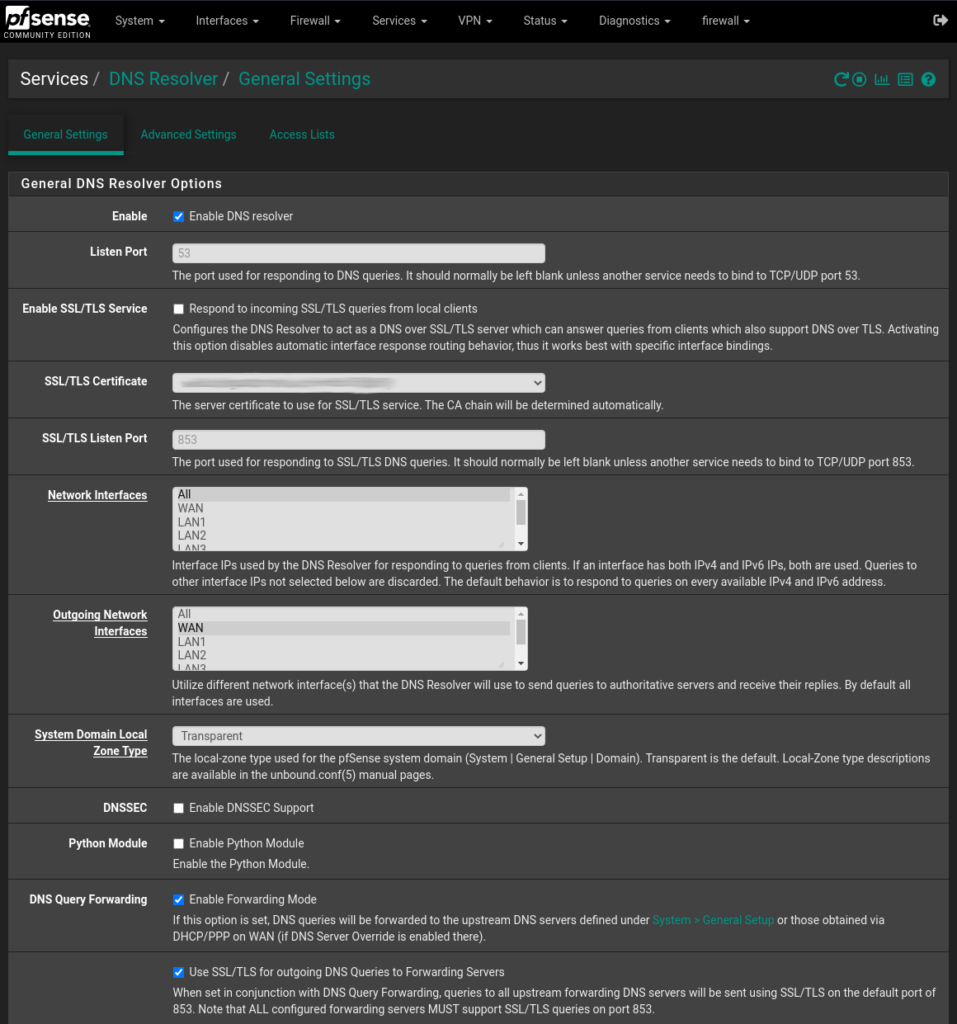
To configure the DNS resolver to send DNS queries over TLS, you first need to enable it. Navigate to Services > DNS Resolver and on the tab General Settings check the Enable DNS resolver checkbox, also select ALL for Network Interfaces and your WAN interface for Outgoing Network Interfaces.
Note: This guide applies only to DNS resolver. Forwarding mode must be disabled in the DNS resolver settings, since the example below defines its own forwarding zone.
Next let’s enable the TLS capabilities, let’s check the Enable Forwarding Mode and the Use SSL/TLS for outgoing DNS Queries to Forwarding Servers checkbox.
DNS_Settings
Click Save and you’re good to go ! Your pfSense appliance is now sending DNS queries to your provider DNS servers over TLS.
Check your setup
To check if your setup is working properly, you can perform various tests using Cloudflare DNS & browser checks.
Cloudflare Browser Check1.1.1.1 DNS Check (Only works with Cloudflare)
You can also confirm if DNS queries are being sent over TLS by performing a packet capture on the WAN interface. To do that go to Diagnostics > pfTop. In the Filter expression field enter the following :
port 53 or port 853
Now only DNS traffic is showed, note that unencrypted DNS is still allowed and can go through, the best way to mitigate this problem is to deny outbound traffic on port 53 if wanted.
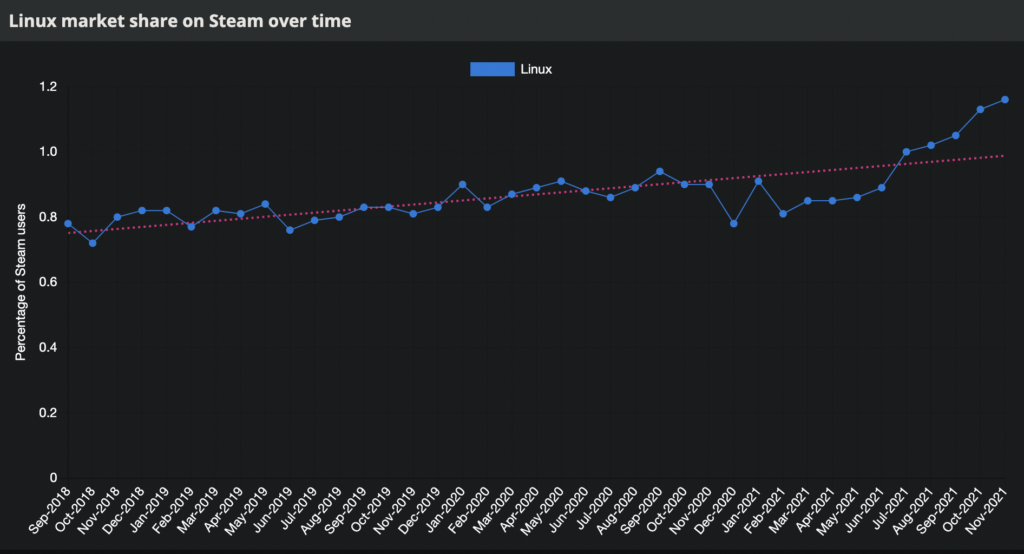
With the growing community of Linux gamers, the attention on Linux gaming is improving, a lot. Especially this year with the announcement of the Steam Deck (A Linux-based, switch like sized, mini PC), the Linux market share has never been that populated.
Source : Gaming on Linux / Steam Survey
1% of market share may not seem that high but, it’s a big leap forward for the open-source and gaming community as a whole. A free and open-source alternative is possible.
Linux also bring several advantages over a Windows OS, It is usually faster, customizable, the base OS consume less RAM, more stable and of course it’s free and open source. Overall, it offer a boost of performance when used with a native or a well ported version of the game.
What to do before switching to Linux ?
Do not switch to linux right-away. Dual-boot it. Beginner friendly distributions like Ubuntu can have an integrated part in the installation process to dual boot with Windows.
Using that method permit a no-compromise solution, where you can try and enjoy the best of both worlds. Try and prepare your OS first, then you can get rid of Windows if needed or if everything works as expected.
Check your compatibility
Depending of your hardware & your games, some components may require some tinkering or may not work at all.
For the hardware support, if you have a standard gaming PC everything should be OK, from my experience only obscure tablets, strange SOC or some laptops with specific hardware can experience difficulties running Linux. If you are not confident you can just lookup for your hardware compatibility on the internet or try a live version of the Linux distribution of your choice.
For game compatibility you can use one of the best tool out there : ProtonDB it list every Steam game and how well it works. Even if only Steam games are listed here, you can check Lutris for a lot of other games.
ProtonDB Homepage
Note : A lot of Multiplayer games are not working due to anti-cheat compatibility issues, the situation is improving but that something you need to keep in mind.
Choosing which distribution of Linux to use
Honestly, there is thousands of Linux versions, It’s really up to you. I can only recommends the most used, user-friendly and maintained distributions like Ubuntu or Fedora.
Native games and Proton
There are several ways you can play Linux titles.
Linux Native games. Some games are build to work natively on Linux, there are not munch but they do exists ! In that case, install it and play it like you will on your Windows PC.
Proton is a compatibility layer developed by Valve. Basically, it allow Windows games to run directly on Linux. Because Linux and Windows do not use the same kernel and are built differently, you can’t run a Windows game directly on Linux. The game or program makes calls to the system in a specific way so you need a way to convert system calls made for Windows to Linux. That’s precisely what Proton is doing.
Other solutions. Other solutions exists too like Wine or CrossOver, but there are more complicated to setup or paid solutions. That’s why we will focus on the two previous one.
Note : Proton is based on Wine (Wine Is Not an Emulator)
How to play ?
Steam games
Great , now that you have been introduced to the technologies that makes Linux gaming possible, I will show you how to play easily any game using this tools (Or at least try too).
First, Install Steam, you can install it using the graphical interface app store of your system or by typing this command in your terminal.
Steam installation (Ubuntu)
sudo apt install steam
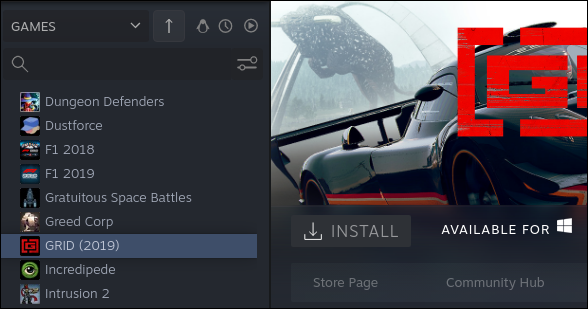
Launch Steam, you will see a penguin icon to the top of your games list. Click on it, it will show you Linux native only games.
Source : How To Geek
Good, to play every games of your library, click on the icon again to show all of your games, non native games are greyed out, you need to enable proton in Steam to install and play them.
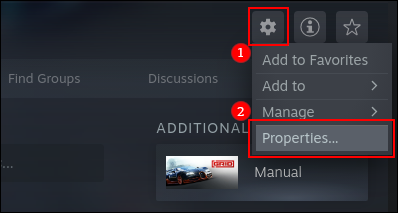
For that heads to the settings, properties, compatibility tab.
Source : How To Geek
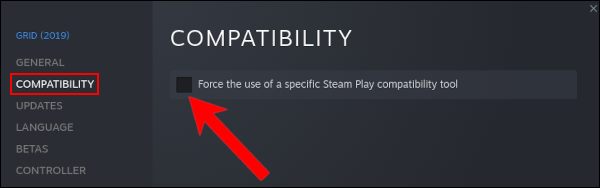
Check the case “Force the Use of a Specific Steam Play Compatibility Tool.” It should be the only option available.
Source : How To Geek
You can now install and play most of the games of your Steam library.
Keep in mind, not every game is playable or even downloadable, check the game databases to see the level of compatibility.
Other games
You can also install Lutris, to play any non-steam games, or you can just use Lutris as an global launcher for all of your games (Steam included)
💡Supported games of other launchers include Epic Games, GOG and more ...
Lutris is needed for other games, in addition of using the Proton compatibility layer, it also provide the necessary scripts for the installation and the execution of other games.
To install Lutris, you can either download it from your OS application store or follow the documentation on their website. You first need to add the Lutris repository, update the package list and install the Lutris package.
Launch Lutris and access all of your games ! First click on “Lutris” in Sources, then type the wanted game of your choice. You can also connect every launcher account to access every other launcher games.