We need to generate the password or keyfile that can unlock your LUKS partition, this “password” will then be a way to unlock your LUKS partition. To create it we can use the following command.
You then need to create a LUKS partition using GUI, or using command line with the following commands :
Find the partition you want to encrypt
lsblk
Then we need to use an utility that is already install on most of Linux distributions (cryptsetup) and use it to encrypt our partition with our keyfile.
cryptsetup luksFormat partition/pathto/keyfile
When it’s done, you should be able to open your encrypted partition using the same utility. In this example DEV is your LUKS partition, MAPPING a name you want to give to the LUKS mapping (That can be anything).
cryptsetup luksOpen DEV MAPPING --key-file /pathto/keyfile
Then you can close it.
cryptsetup luksClose MAPPING
Now that we checked that our partition encryption works and our keyfile too, we can plug the USB drive we want to use and copy the keyfile to it.
cp /pathto/keyfile/pathtousbdrive/keyfile
We’re almost done, now we need to specify that we want to unlock our partition automatically when the USB is connected in the crypttab configuration file.
nano /etc/crypttab
And add a line that will vary depending of your configuration
There you go, the last step is to regenerate the initramfs image of your system to apply these changes, to do that use the following commands depending of your system.
If you want to be safe you can also backup the current initramfs you are using.
Maybe you just installed Ubuntu and don’t want to use the Snap application format or maybe you needed some Snap packages but not anymore and you want to get rid of the Snap processes and folders.
What is Snap ?
Snap is package type just like Flatpack or Appimage, it is used to ship software and it is cross-compatible with other Linux distros as well. It has been pushed forward by Canonical, the company that mainly develop Ubuntu but it also suffer from a really bad reputation.
How to delete Snap ?
Here is a small guide to delete and purge Snap from your system.
Alternatively, you can use a script like https://github.com/popey/unsnap this kind of script automate the whole process and remplace every Snap package you previously had installed by it’s Flatpack version.
Crowdsec is a relatively new tool in the security world, it’s an Intrusion Prevention Systems (IPS), it allow the detection of threats and the adding of necessary firewall rules if needed.
Crowdsec differs from other IPS because of the collaboration aspect. It also offer an on-premise or cloud dashboard.
You may have heard, or used Fail2ban, it basically do the same things, but with more functionalities.
Pros
Open-Source
Collaborative security
Decoupled detection and action software
Ease of use
IPv6 Ready
GDPR Compliant
Easy to install & setup
Large support for many services
Cons
Not easily understandable
Can be hard to setup depending on your setup
Type of recognized threats
Threats recognized by Crowdsec
How does it works ?
First it gather the logs and parse them from any source, it also applies scenarios to identify cyber-threats, then rules are set depending of the desired behavior.
Crowdsec has two main components, the scenarios and the bouncers. The scenarios detect the type of threat and the bouncers make an action to ban/correct it. You can also choose to only use one of the two parts.
Bouncers are used to “apply” decisions, from threats detected by the Crowdsec software.
Before installing the basic bouncer that will act on your firewall rules, you need to check if your system is using iptable or nftableto determine where your system should act to prevent the attacks.
Then, you can use the basic firewall bouncer. It will check for the most common cases of attacks on your server (Brute-force, Slow brute-force, …).
apt install crowdsec-firewall-bouncer-iptables
Install the Linux firewall bouncer
Then, depending of the service(s) you are running on your server, you can use one more other bouncers.
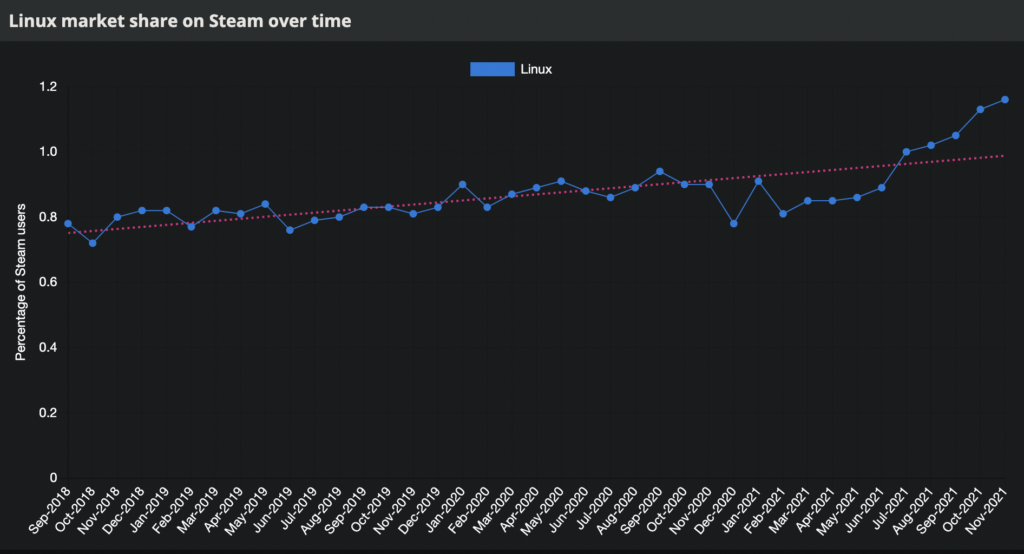
With the growing community of Linux gamers, the attention on Linux gaming is improving, a lot. Especially this year with the announcement of the Steam Deck (A Linux-based, switch like sized, mini PC), the Linux market share has never been that populated.
Source : Gaming on Linux / Steam Survey
1% of market share may not seem that high but, it’s a big leap forward for the open-source and gaming community as a whole. A free and open-source alternative is possible.
Linux also bring several advantages over a Windows OS, It is usually faster, customizable, the base OS consume less RAM, more stable and of course it’s free and open source. Overall, it offer a boost of performance when used with a native or a well ported version of the game.
What to do before switching to Linux ?
Do not switch to linux right-away. Dual-boot it. Beginner friendly distributions like Ubuntu can have an integrated part in the installation process to dual boot with Windows.
Using that method permit a no-compromise solution, where you can try and enjoy the best of both worlds. Try and prepare your OS first, then you can get rid of Windows if needed or if everything works as expected.
Check your compatibility
Depending of your hardware & your games, some components may require some tinkering or may not work at all.
For the hardware support, if you have a standard gaming PC everything should be OK, from my experience only obscure tablets, strange SOC or some laptops with specific hardware can experience difficulties running Linux. If you are not confident you can just lookup for your hardware compatibility on the internet or try a live version of the Linux distribution of your choice.
For game compatibility you can use one of the best tool out there : ProtonDB it list every Steam game and how well it works. Even if only Steam games are listed here, you can check Lutris for a lot of other games.
ProtonDB Homepage
Note : A lot of Multiplayer games are not working due to anti-cheat compatibility issues, the situation is improving but that something you need to keep in mind.
Choosing which distribution of Linux to use
Honestly, there is thousands of Linux versions, It’s really up to you. I can only recommends the most used, user-friendly and maintained distributions like Ubuntu or Fedora.
Native games and Proton
There are several ways you can play Linux titles.
Linux Native games. Some games are build to work natively on Linux, there are not munch but they do exists ! In that case, install it and play it like you will on your Windows PC.
Proton is a compatibility layer developed by Valve. Basically, it allow Windows games to run directly on Linux. Because Linux and Windows do not use the same kernel and are built differently, you can’t run a Windows game directly on Linux. The game or program makes calls to the system in a specific way so you need a way to convert system calls made for Windows to Linux. That’s precisely what Proton is doing.
Other solutions. Other solutions exists too like Wine or CrossOver, but there are more complicated to setup or paid solutions. That’s why we will focus on the two previous one.
Note : Proton is based on Wine (Wine Is Not an Emulator)
How to play ?
Steam games
Great , now that you have been introduced to the technologies that makes Linux gaming possible, I will show you how to play easily any game using this tools (Or at least try too).
First, Install Steam, you can install it using the graphical interface app store of your system or by typing this command in your terminal.
Steam installation (Ubuntu)
sudo apt install steam
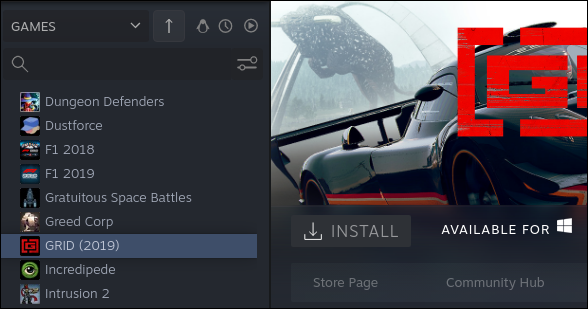
Launch Steam, you will see a penguin icon to the top of your games list. Click on it, it will show you Linux native only games.
Source : How To Geek
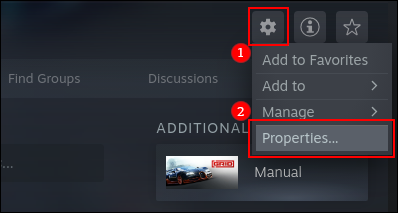
Good, to play every games of your library, click on the icon again to show all of your games, non native games are greyed out, you need to enable proton in Steam to install and play them.
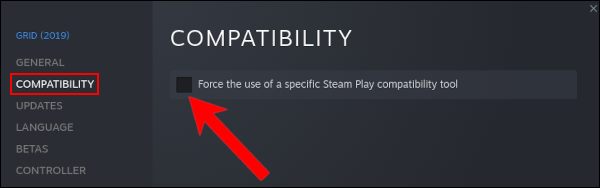
For that heads to the settings, properties, compatibility tab.
Source : How To Geek
Check the case “Force the Use of a Specific Steam Play Compatibility Tool.” It should be the only option available.
Source : How To Geek
You can now install and play most of the games of your Steam library.
Keep in mind, not every game is playable or even downloadable, check the game databases to see the level of compatibility.
Other games
You can also install Lutris, to play any non-steam games, or you can just use Lutris as an global launcher for all of your games (Steam included)
💡Supported games of other launchers include Epic Games, GOG and more ...
Lutris is needed for other games, in addition of using the Proton compatibility layer, it also provide the necessary scripts for the installation and the execution of other games.
To install Lutris, you can either download it from your OS application store or follow the documentation on their website. You first need to add the Lutris repository, update the package list and install the Lutris package.
Launch Lutris and access all of your games ! First click on “Lutris” in Sources, then type the wanted game of your choice. You can also connect every launcher account to access every other launcher games.
Tor, short for The Onion Router, is free and open-source software for enabling anonymous communication. It directs Internet traffic through a free, worldwide, volunteer overlay network, consisting of more than six thousand relays, for concealing a user’s location and usage from anyone conducting network surveillance or traffic analysis. Using Tor makes it more difficult to trace the Internet activity to the user. Tor’s intended use is to protect the personal privacy of its users, as well as their freedom and ability to conduct confidential communication by keeping their Internet activities unmonitored.
Questions you should clarify before configuring a Tor service
Do you want to run a Tor exit or non-exit (bridge/guard/middle) relay?
If you want to run an exit relay: Which ports do you want to allow in your exit policy? (More ports usually means potentially more abuse complaints.)
What external TCP port do you want to use for incoming Tor connections? (“ORPort” configuration: We recommend port 443 if that is not used by another daemon on your server already. ORPort 443 is recommended because it is often one of the few open ports on public WIFI networks. Port 9001 is another commonly used ORPort.)
What email address will you use in the ContactInfo field of your relay(s)? This information will be made public.
How much bandwidth/monthly traffic do you want to allow for Tor traffic?
Bridge relays are Tor relays that are not listed in the public Tor directory.
That means that ISPs or governments trying to block access to the Tor network can’t simply block all bridges. Bridges are useful for Tor users under oppressive regimes, and for people who want an extra layer of security because they’re worried somebody will recognize that they are contacting a public Tor relay IP address.
A bridge is just a normal relay with a slightly different configuration. See How do I run a bridge for instructions.
Several countries, including China and Iran, have found ways to detect and block connections to Tor bridges. Obfsproxy bridges address this by adding another layer of obfuscation. Setting up an obfsproxy bridge requires an additional software package and additional configurations. See our page on pluggable transports for more info.
Docker use OS-level virtualization to deliver software in packages called containers, using that technology is more secure if you are planning to host other services on the same host as well.
In this case we are using “docker-compose” for convenience, with one file we can deploy the full Tor-bridge with minimal effort and the same efficiency as in plain docker.
How to host a bridge using docker-compose
To host a Tor bridge container, your first need to have a docker & docker-compose installed. Then make sure you select two public ports and forward them to your Tor bridge server if you are using NAT based network environment.
Create two following files in the same directory. Make sure to change your environment variable in the .env file to match your current setup.
Make sure to uncomment variables to use them properly, make also sure to not edit the docker-compose volumes structure, or if you want to do so, check the link below.
docker-compose.yml
version: "3.4"
services:
  obfs4-bridge:
    container_name: obfs4-bridge
    image: thetorproject/obfs4-bridge:latest
    environment:
    # Exit with an error message if OR_PORT is unset or empty.
      - OR_PORT=${OR_PORT:?Env var OR_PORT is not set.}
    # Exit with an error message if PT_PORT is unset or empty.
      - PT_PORT=${PT_PORT:?Env var PT_PORT is not set.}
    # Exit with an error message if EMAIL is unset or empty.
      - EMAIL=${EMAIL:?Env var EMAIL is not set.}
    env_file:
      - .env
    volumes:
      - data:/var/lib/tor
    ports:
      - ${OR_PORT}:${OR_PORT}
      - ${PT_PORT}:${PT_PORT}
    restart: unless-stopped
    volumes:
      data:
    name:
      tor-datadir-${OR_PORT}-${PT_PORT}
.env
# This file assists operators in (re-)deploying an obfs4 bridge Docker container.  You need the tool 'docker-compose' to use this file. You can find it in the Debian package 'docker-compose'.
First, you need to create a configuration file, ".env", in the same directory as this file, "docker-compose.yml".  Add the following environment variables to this configuration file.  EMAIL is your email address; OR_PORT is your onion routing port; and PT_PORT is your obfs4 port:
EMAIL=you@example.com
OR_PORT=XXX
PT_PORT=XXX
## If needed, you can also activate there an additional variables processing with:
##   OBFS4_ENABLE_ADDITIONAL_VARIABLES=1
## followed by defining desired torrc entries prefixed with OBFS4V_
# For example:
##   OBFS4V_AddressDisableIPv6=1
The first thing you can do is check your logs for an error, if you see none and you see the bandwidth speedtest complete, you can check for your relay on the Tor metrics website.
docker logs obfs4-bridge
To identify your relay you need your tor bridge hashed identity key, you can find it in the logs, it should look like this.
Your Tor bridge's hashed identity key fingerprint is 'DockerObfs4Bridge AAAABBBBCCCCDDDDEEEE'
If you are here, you may had problems to manage your fans speed or check your temps on Linux.
Fortunately there are some tools to help you with that, one of the most known is lm-sensors, it provide a tool for GNU/Linux systems to monitor and handle temperatures, tensions, fan speed & moisture levels.
The current supported sensors are :
ISA hardware monitoring chips.
I2C/SMBus hardware monitoring chips.
SPI hardware monitoring chips.
Hardware monitoring features integrated in Super-I/O chips.
Hardware monitoring features integrated in south bridges.
Thermal sensors integrated in CPU.
Thermal sensors integrated in memory modules.
Installation & detection
Proceed to the installation of “lm-sensors”.
sudo apt install lm-sensors
Then you can run the sensor detection tool.
sudo sensors-detect
The output should look like this, it can vary depending of your hardware.
sensors-detect version 3.6.0# System: ***# Board: ***# Kernel: ***# Processor: ***This program will help you determine which kernel modules you needto load to use lm_sensors most effectively. It is generally safeand recommended to accept the default answers to all questions,unless you know what you're doing.Some south bridges, CPUs or memory controllers contain embedded sensors.Do you want to scan for them? This is totally safe. (YES/no): Module cpuid loaded successfully.Silicon Integrated Systems SIS5595... NoVIA VT82C686 Integrated Sensors... NoVIA VT8231 Integrated Sensors... NoAMD K8 thermal sensors... NoAMD Family 10h thermal sensors... NoAMD Family 11h thermal sensors... NoAMD Family 12h and 14h thermal sensors... NoAMD Family 15h thermal sensors... NoAMD Family 16h thermal sensors... NoAMD Family 17h thermal sensors... Success! (driver `k10temp')AMD Family 15h power sensors... NoAMD Family 16h power sensors... NoHygon Family 18h thermal sensors... NoIntel digital thermal sensor... NoIntel AMB FB-DIMM thermal sensor... NoIntel 5500/5520/X58 thermal sensor... NoVIA C7 thermal sensor... NoVIA Nano thermal sensor... No
Here the lm-sensors software is trying to guess what kind of CPU you have to find which sensors are present, some prompts will then appears, just go for the recommended values and reboot.
If you have a graphics card, your GPU sensors should also be recognized.
To check every detected sensors, just type the following command.
sensors
If you are running on a laptop, this install can provide more information to your fan controllers and in some case, resolve fan speed & temperatures issues.
GUI for Temperature & Fan speed visualisation
You can use psensor to get a quick visualisation of your temps and fan speed after executing the lm-sensors tool
You may have accidentally erased your whole NAS drives or just been a victim of a software bug, but for a reason or another your Iomega NAS may have lost his firmware.
IX-Front-Screen-Error
On theses devices, the firmware is located on the installed drives, not in an integrated flash memory on the device, so if you lose your drives data, you may as well lose the OS.
This product being in EOL (End Of Lifecycle) it’s very difficult to find resources about how to install the firmware again, plus theses devices were shipped with the drives and firmware installed.
From what I’ve found online, you have to reach to Lenovo directly to get a recovery software/solution for the NAS, but there is also several other solutions.
Warning : This is going to recover your Iomega device in working condition, this will not recover your drives data. This method also seems to not work for everyone so be advised.
First we need some tools and firmware to recover the NAS :
Lenovo Iomega ix4-200d (Cloud or non cloud version)
Two base hard drives to install the firmware on
FAT 32 Formatted USB Drive
The needed backup files (Files and mirrors linked)
First we need to prepare the drives, but with the recent updates, drives now needs to be initialised in GPT for larger capacity support, you also need to wipe them completely to erase any older partition data. To do that you can use your disk manager on MacOs, Windows and Linux.
Method 1 : Classic installation
Prepare your NAS, Remove every drives except the drives in the slot 1 and 2, they will be the targeted disks for the firmware install. Two disk are recommended to rebuild the raid group directly, but if the installation fails, you can try again with only one.
Make the bootable recovery USB, you first have to format your USB key to FAT 32, then extract the ix4-200d-recovery file to the USB support.
Install the firmware, Then, plug your USB key to the back, on the top USB port of the NAS. While pressing the NAS reset button, power on the NAS, keep holding for 60/70 seconds. The device will reboot. After the reboot logo showed up, you can release the reset button, watch for the hard drive blue activity light to see if you succeed.
Finish the installation, Wait for the firmware to do his business, it should take about 5 to 10 minutes, the unit should turn off and back up again, If it’s not turning on, start it manually. Keep the USB plugged until the usual interface shows up. Then shut it down, remove the USB drive and start it again !
You now should have a working NAS again !Some updates may be available in the update tab as the firmware still not the most recent.
Method 2 : Physical installation
Follow the instructions of the instructions.txt file from the downloaded files (Specific hardware needed)
You may have encountered the following warning after a Nextcloud install or you may even never seen it but Nextcloud need to execute some background tasks regularly to insure it’s good working condition. Some cleanups need to be executed on a daily basis.
If you don’t know what I’m talking about, check your Nextcloud application settings : Open your Nextcloud instance with a privileged account > click on your icon > Settings > Basic settings.
There is 3 different ways of executing these scheduled tasks :
AJAX
Webcron
Cron
The AJAX is the default one but it’s the less reliable because this technique only execute one task per page reloaded by an user, it requires many visits to be efficient.
The Webcron can be an good choice depending on your setup, but it rely on an external source to execute your Cron. You can use a service like easyCron to load your http[s]://<domain-of-your-server>/nextcloud/cron.php URL, that will trigger the execution of the jobs.
The Cron method is, to me, the most reliable, you just have to enter how often you want your background tasks to run. As long your server is running, the task will execute, it’s that simple.
Setup
Two ways are gonna be covered, the classic way or the Docker way, depending of your install type.
Classic installation :
You just have to set a Cron task, it’s that easy ! To check your active Cron jobs just execute the following command in a terminal.
crontab -l
This will list (-l) your active Cron tasks.
To edit (-e) you Cron file you will need to edit it as the user www-data (The nextcloud user).
crontab -e -u www-data
Here you can insert a new line at the end of the document with the following.
*/5 * * * * php -f /var/www/nextcloud/cron.php
This will trigger the Cronjob execution every 5 Minutes (Time used in the Nextcloud Doc)
On some systems it might be required to call php-cli instead of php.
If you want to force the execution of Cronjobs, you can enter the command manually :
In Docker the idea is pretty munch the same, but the process must be executed in the host system instead of the container itself. By editing the host Crontab file you can specify the container and the user you want to use.
First we need to identify the Nextcloud container name.
docker ps
With this command, you can list every running containers. Find the name of your nextcloud one and get to the next step. In our case the container will be named “Nextcloud“.
Next, we are gonna try the command manually and check if it’s triggered in the container. In the host terminal type :
docker exec -u www-data nextcloud php cron.php
If the background jobs tab now show a green dot after a page refresh, the command is working, we just need to make it run every 5 Minutes.
Successful Background Jobs Execution
On your Docker host system, edit the Cron file by typing :
crontab -e
Add the following line at the end to execute it every five minutes :
Some OS, have non persistant Cron settings after reboot (e.g Unraid), to counter that we can edit the starting script of the OS to insert the Nextcloud Cronjob line after startup.
In Unraid, the startup script is located under /boot/config/go, by editing this file, we can execute actions after the initial startup.
nano /boot/config/go
In the “go” file add the following script at the end :
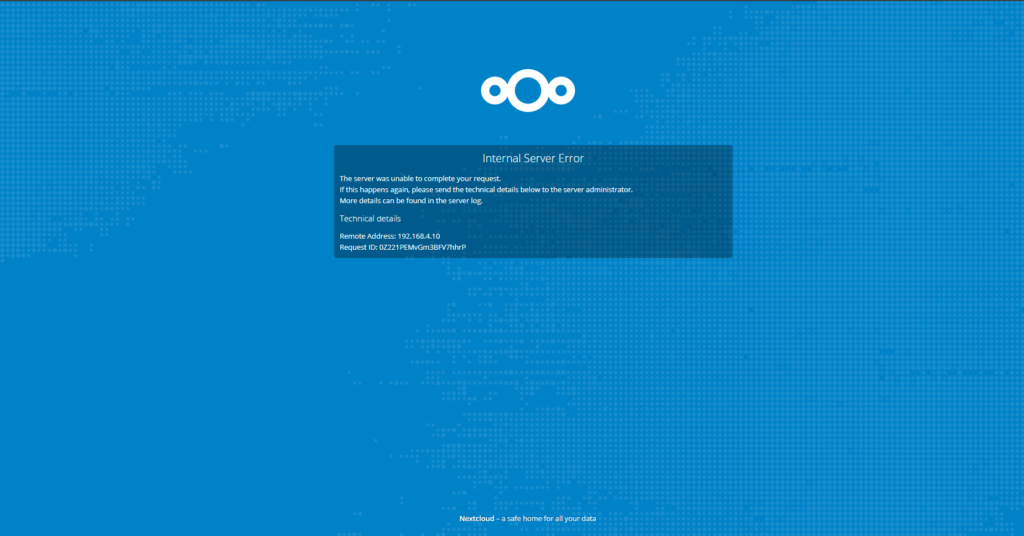
As a classic HomeLab enjoyer I self-host most of the stuff I use daily. But few days ago while maintaining my Nextcloud instance, I updated Nextcloud & MariaDB to catch up on the latest patches. Unfortunately, my docker install was unable to start properly again and I was greeted by the following error :
The Nextcloud error I encountered
So I went to check the Nextcloud logs on my docker container with the following command :
docker logs nextcloud
I immediately realized that was a database error and not a Nextcloud one, the following messages where present :
Doctrine\DBAL\Exception\DriverException: An exception occurred while executing a query: SQLSTATE[HY000]: General error: 4047 InnoDB refuses to write tables with ROW_FORMAT=COMPRESSED or KEY_BLOCK_SIZE. Update failed
From my small knowledge in programming I know one thing, Doctrine is like a link between operations that are queued in the app (Nextcloud in this case) waiting for being written to the database.
InnoDB refuses to write tables with ROW_FORMAT=COMPRESSED
If you want a quick fix you can just rollback to a previous version of mariadb (10.5.11) but if you want to know more about this issue, just stick with me for a bit.
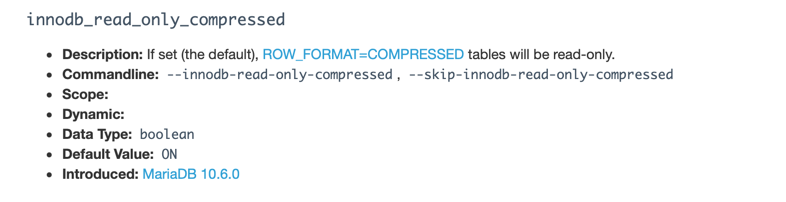
From MariaDB 10.6.0, tables that are of the COMPRESSED row format are read-only by default, the goal here is to deprecate the feature in the future. By setting the innodb_read_only_compressed 3 variable to OFF it make the tables writable.
read_only_compressed
However, this is a workaround rather that a solution. Tables must be migrated. Hopefully they should be migrated automatically by Nextcloud in an incoming update soon. It is wise not to touch the table’s definition in order to not break the (hopefully) incoming Nextcloud migration.
How to fix it ?
Standard Install
Access you MariaDB server
Edit the /etc/my.cnf.d/server.cnf file
Find the [mysqld] section
Add the following statement “innodb_read_only_compressed=OFF”
Restart your SQL service
Docker Install
If you are running your app in docker container you can add the command in your docker-compose script to be executed at every startup :