Crowdsec is a relatively new tool in the security world, it’s an Intrusion Prevention Systems (IPS), it allow the detection of threats and the adding of necessary firewall rules if needed.
Crowdsec differs from other IPS because of the collaboration aspect. It also offer an on-premise or cloud dashboard.
You may have heard, or used Fail2ban, it basically do the same things, but with more functionalities.
Pros
Open-Source
Collaborative security
Decoupled detection and action software
Ease of use
IPv6 Ready
GDPR Compliant
Easy to install & setup
Large support for many services
Cons
Not easily understandable
Can be hard to setup depending on your setup
Type of recognized threats
Threats recognized by Crowdsec
How does it works ?
First it gather the logs and parse them from any source, it also applies scenarios to identify cyber-threats, then rules are set depending of the desired behavior.
Crowdsec has two main components, the scenarios and the bouncers. The scenarios detect the type of threat and the bouncers make an action to ban/correct it. You can also choose to only use one of the two parts.
Bouncers are used to “apply” decisions, from threats detected by the Crowdsec software.
Before installing the basic bouncer that will act on your firewall rules, you need to check if your system is using iptable or nftableto determine where your system should act to prevent the attacks.
Then, you can use the basic firewall bouncer. It will check for the most common cases of attacks on your server (Brute-force, Slow brute-force, …).
apt install crowdsec-firewall-bouncer-iptables
Install the Linux firewall bouncer
Then, depending of the service(s) you are running on your server, you can use one more other bouncers.
An other step towards internet privacy & security.
Quick recap about DNS and encrypted internet traffic.
Domain Name Service (DNS) acts like a phone book, but instead of linking a phone number to a person, it links an IP address to a domain name. It’s like a huge registry remembering entries for IP/domain name association.
When a computer wants to reach out a domain, let’s say google.com, it ask the DNS server for an IP to reach. because computers communicates with IP adresses to find the path to access it, this service is one of the most important on the internet. The DNS server then “resolve” the domain name to an IP and send back the answer to the computer who asked for it.
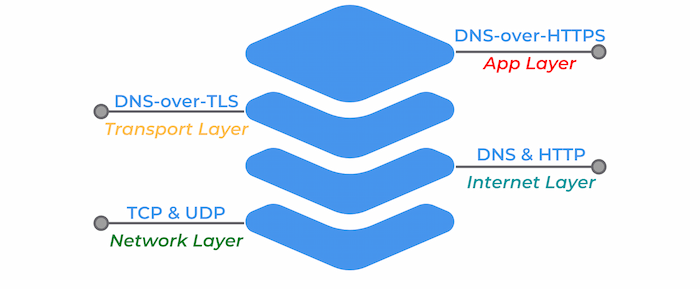
DNS Protocol
But why are we talking about that old protocol ?
By default, DNS queries and responses are sent in plain text (via UDP), which means they can be read by networks, ISPs, or anybody able to monitor transmissions. Even if a website uses HTTPS, the DNS query required to navigate to that website is exposed.
This lack of privacy has a huge impact on security and, in some cases, human rights; if DNS queries are not private, then it becomes easier for governments to censor the Internet and for attackers to stalk users’ online behavior.
DNS over TLS protected traffic. Source : Cloudflare
More and more public DNS providers start to support encrypted DNS requests, this prevents third parties to access or modify the DNS queries made between your terminal and the DNS server.
DoH is DNS over HTTPS, an encrypted DNS making use of port 443, which mean that it appears just like regular HTTPS traffic. This kind of requests are more interesting from a privacy standpoint, because they cannot be differentiated from other day to day HTTPS traffic. This is certainly the best solutions for individuals.
Note : If you are using a firewall or other networking equipment keep in mind that the DNS traffic in not even recognizable and cannot be treated as such, no rules or traffic routing can be applied to this particular DNS traffic because it looks just like regular HTTPS.
DoT on the other hand is DNS over TLS, an encrypted DNS using port 853. It’s still a DNS request, but wrapped in TLS, in a lower layer level encryption. It also ensure that requests are not tampered during the communication with the DNS server.
Source : dnsfilter.com
PfSense Firewall configuration for DoT
Prerequisites
First, you need to choose your DNS resolver. If it’s not already done make sure that it support encrypted DNS queries. Feel free to check the privacy project website to find one.
List of public DNS | Encryption support indicated
Make sure your pfSense version is greater than 2.4.4. If not, you can find the old tutorial on the Netgate website below.
Setup for pfSense 2.4.4 and before
Step 1
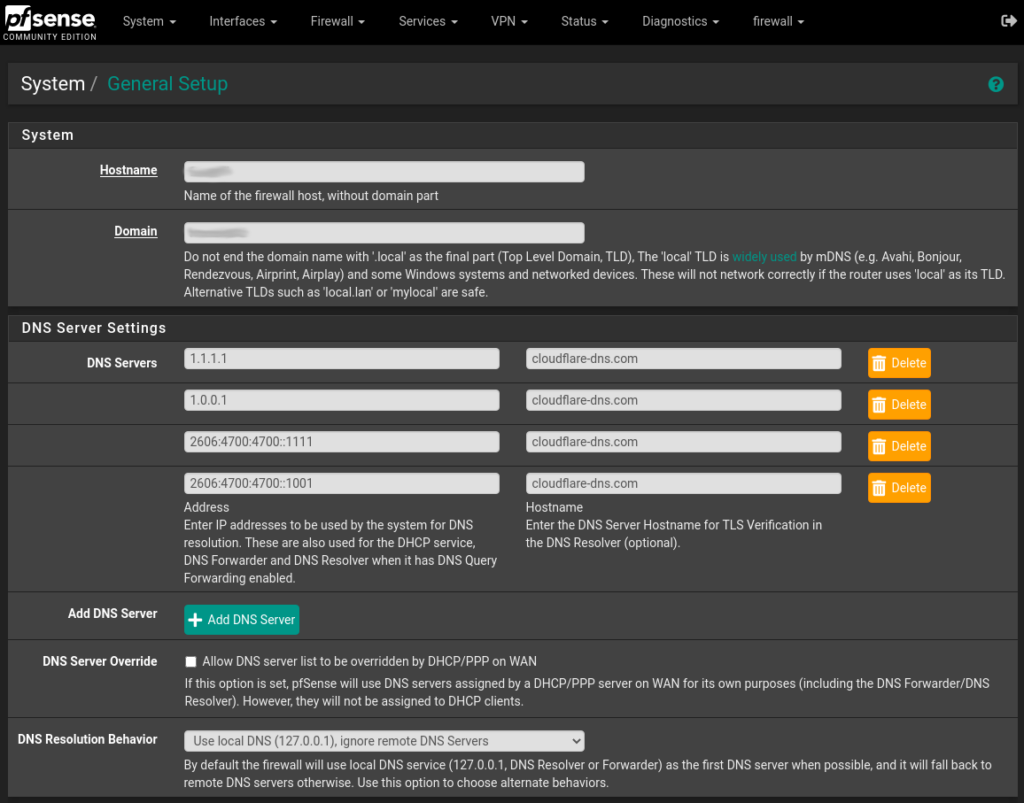
The first step is to ensure that your selected DNS provider servers are in use, even if the DNS queries are not sent over TLS for now (step 2). To set this up, navigate to System > General Settings and under DNS servers add the IP addresses & hostnames for your encrypted DNS provider. Also use the Use local DNS, ignore DNS Servers option in the drop down menu.
Pfsense DNS Settings
After entering the informations, scroll down to the bottom of the page and click Save. Your pfSense server will now use your selected DNS providers for it’s own DNS requests.
Feel free to mix and match the servers, you can add as many as you like, and using multiple DNS providers can help prevent an upstream outage from causing loss of DNS resolution on the firewall.
Step 2
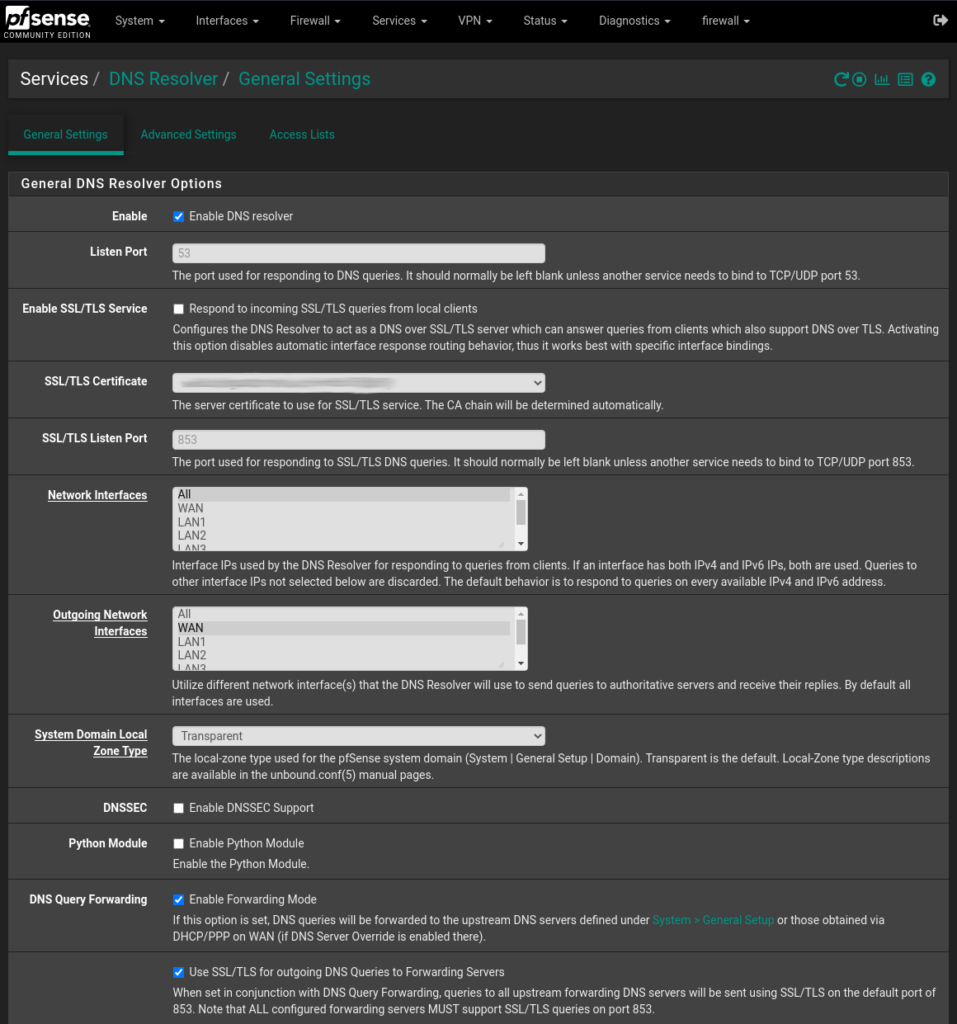
To configure the DNS resolver to send DNS queries over TLS, you first need to enable it. Navigate to Services > DNS Resolver and on the tab General Settings check the Enable DNS resolver checkbox, also select ALL for Network Interfaces and your WAN interface for Outgoing Network Interfaces.
Note: This guide applies only to DNS resolver. Forwarding mode must be disabled in the DNS resolver settings, since the example below defines its own forwarding zone.
Next let’s enable the TLS capabilities, let’s check the Enable Forwarding Mode and the Use SSL/TLS for outgoing DNS Queries to Forwarding Servers checkbox.
DNS_Settings
Click Save and you’re good to go ! Your pfSense appliance is now sending DNS queries to your provider DNS servers over TLS.
Check your setup
To check if your setup is working properly, you can perform various tests using Cloudflare DNS & browser checks.
Cloudflare Browser Check1.1.1.1 DNS Check (Only works with Cloudflare)
You can also confirm if DNS queries are being sent over TLS by performing a packet capture on the WAN interface. To do that go to Diagnostics > pfTop. In the Filter expression field enter the following :
port 53 or port 853
Now only DNS traffic is showed, note that unencrypted DNS is still allowed and can go through, the best way to mitigate this problem is to deny outbound traffic on port 53 if wanted.